250x250
Recent Posts
Recent Comments
Archives
- Today
- Total

KimDove
안녕하세요, 딥러닝 엔지니어 김둘기 입니다.
비둘기 둥지
[Kaggle / pytorch] 1. Cats vs Dogs 본문
728x90
1. Cats vs Dogs
- CNN 관련 딥러닝을 한다면 MNIST, FashionMNIST, CIFAR-10과 함께 반드시 거쳐야할 데이터 셋이 있다.
바로 커스텀 데이터 셋으로 CNN 모델 구성하기에 제일 만만한 Cats vs Dogs 데이터 셋. - 나도 Keras로 딥러닝을 맨 처음에 공부하기 시작했을 때 위에서 언급한 데이터 셋 이후로
Cats vs Dogs 데이터 셋으로 학습했었다. - 그리고 사실 인공지능 관련된 재밌는 짤을 찾아서 데이터 셋을 선정하였다.

[문제의 그 짤방...]
1-1. 데이터 셋 가져오기
- Kaggle API를 이용하여 Kaggle에서 데이터 셋을 다운 받았다.
!pip install kaggle

## 출력 결과
WARNING: The directory '/home/jovyan/.cache/pip' or its parent directory is not owned or is not writable by the current user. The cache has been disabled. Check the permissions and owner of that directory. If executing pip with sudo, you should use sudo's -H flag.
Requirement already satisfied: kaggle in /opt/conda/lib/python3.9/site-packages (1.5.12)
Requirement already satisfied: certifi in /opt/conda/lib/python3.9/site-packages (from kaggle) (2021.10.8)
Requirement already satisfied: six>=1.10 in /opt/conda/lib/python3.9/site-packages (from kaggle) (1.16.0)
Requirement already satisfied: python-slugify in /opt/conda/lib/python3.9/site-packages (from kaggle) (6.1.2)
Requirement already satisfied: python-dateutil in /opt/conda/lib/python3.9/site-packages (from kaggle) (2.8.2)
Requirement already satisfied: tqdm in /opt/conda/lib/python3.9/site-packages (from kaggle) (4.62.3)
Requirement already satisfied: urllib3 in /opt/conda/lib/python3.9/site-packages (from kaggle) (1.26.7)
Requirement already satisfied: requests in /opt/conda/lib/python3.9/site-packages (from kaggle) (2.26.0)
Requirement already satisfied: text-unidecode>=1.3 in /opt/conda/lib/python3.9/site-packages (from python-slugify->kaggle) (1.3)
Requirement already satisfied: idna<4,>=2.5 in /opt/conda/lib/python3.9/site-packages (from requests->kaggle) (3.1)
Requirement already satisfied: charset-normalizer~=2.0.0 in /opt/conda/lib/python3.9/site-packages (from requests->kaggle) (2.0.0)
WARNING: Running pip as the 'root' user can result in broken permissions and conflicting behaviour with the system package manager. It is recommended to use a virtual environment instead: https://pip.pypa.io/warnings/venv
## json 파일 업로드 확인
!ls -1ha ~/dove/TIL/api/kaggle.json
## 캐글 숨김 폴더 생성
!mkdir -p ~/.kaggle
## 토큰 파일 옮기고, 권한 부여
!cp ~/dove/TIL/api/kaggle.json ~/.kaggle/
!chmod 600 ~/.kaggle/kaggle.json
## 데이터 셋 다운로드
!kaggle datasets download -d shaunthesheep/microsoft-catsvsdogs-dataset
## 파일 옮기기
!mkdir -p ~/dove/TIL/AI_study/datasets/zip
## 출력 결과
/home/jovyan/dove/TIL/api/kaggle.json
Downloading microsoft-catsvsdogs-dataset.zip to /home/jovyan/dove/TIL/AI_study/basic/kaggle/cv
100%|████████████████████████████████████████| 788M/788M [01:31<00:00, 11.1MB/s]
100%|████████████████████████████████████████| 788M/788M [01:31<00:00, 8.99MB/s]from sklearn.model_selection import train_test_split
from imutils.paths import list_images
import matplotlib.pyplot as plt
from collections import Counter
import numpy as np
import os, cv2- 학습용 : 검증용 : 시험용 = 0.64 : 0.16 : 0.2로 분할함.
- 샘플링 편향이 발생할 것을 우려하여, 레이블별 비율에 맞게 데이터 셋을 나누어 주었다.
## 학습용, 검증용, 시험용 데이터 셋으로 분할 해주는 함수
def split_dataset(dataset):
  label_collector = lambda data: [lb.split(os.path.sep)[-2] for lb in data]

  labels = label_collector(dataset)
  train, test  = train_test_split(dataset, test_size = 0.2, random_state = 42, stratify = labels)

  labels = label_collector(train)
  train, valid =  train_test_split(train, test_size = 0.2, random_state = 42, stratify = labels)

  return train, valid, test
## 데이터 셋을 구축해주는 함수
def build_dataset(datasets):
images, labels = [], []
image_append, label_append = images.append, labels.append
label_to_digit = {'Cat' : 0, 'Dog' : 1}
for image_path in datasets:
image = cv2.imread(image_path)
try:
image = cv2.cvtColor(image, cv2.COLOR_BGR2RGB)
image = cv2.resize(image, (312, 312))
## 폴더 이름을 기준으로 하여 라벨 값을 가져오고,
## 'Cat', 'Dog'으로 되어 있는 라벨을 0, 1값으로 변환
label = image_path.split(os.path.sep)[-2]
label = label_to_digit[label]
image_append(image)
label_append(label)
## 이미지에 문제가 있는 경우에 그냥 넘어가도록함.
except: pass
images, labels = np.array(images), np.array(labels)
return (images, labels)image_paths = sorted(list_images('~/dove/TIL/AI_study/datasets/cat_dog/PetImages'))
train, valid, test = split_dataset(image_paths)
train_img, train_lb = build_dataset(train)
valid_img, valid_lb = build_dataset(valid)
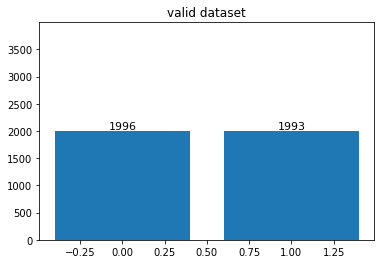
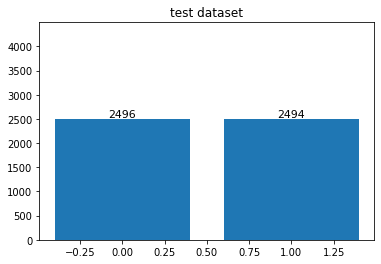
test_img, test_lb = build_dataset(test)1-2. 데이터 분포 확인해보기
- 총 데이터 셋은 한 25,000 정도 있었으나, opencv에서 불러오지 못한 이미지가 약 54장 정도 있었다.
- 삭제된 이미지 때문에 데이터 불균형이 좀 있을 줄 알았으나, 거의 없는거나 마찬가지였다.
def display_distribution(labels, dtype = 'train'):

  lb_count  = Counter(labels)
  max_count = max(lb_count.values())

  plt.bar(lb_count.keys(), lb_count.values())
  plt.ylim(0, max_count + 2000)
  plt.title(f'{dtype} dataset')

  for grade, num in lb_count.items():
      plt.text(
                  grade, num, num,
                  fontsize = 11, color = 'black',
                  horizontalalignment = 'center',
                  verticalalignment = 'bottom'
              )
  plt.show()

display_distribution(train_lb)
display_distribution(valid_lb, dtype = 'valid')
display_distribution(test_lb, dtype = 'test')

## 출력 결과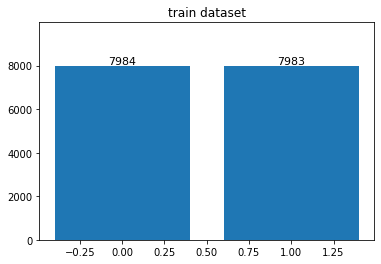
from torch.utils.data import DataLoader, Dataset
from torchvision import transforms, datasets
import torch.nn.functional as F
import torch.optim as optim
import torch.nn as nns
import torch
USE_CUDA = torch.cuda.is_available()
DEVICE = torch.device('cuda' if USE_CUDA else 'cpu')
BATCH_SIZE = 64
MOMENTUM = 0.9
EPOCHS = 100
STEP = 30
LR = 1e-2## 데이터 셋 구축
class CatDogDataset(Dataset):
def __init__(self, images, labels, dtype = 'train'):
self.images = images
self.labels = labels
self.dtype = dtype
self.transforms = {}
self.transforms['train'] = transforms.Compose([
transforms.ToPILImage(),
transforms.RandomHorizontalFlip(),
transforms.RandomCrop(299),
transforms.ToTensor()
])
self.transforms['valid'] = transforms.Compose([
transforms.ToPILImage(),
transforms.Resize(299),
transforms.ToTensor()
])
self.transforms['test'] = transforms.Compose([
transforms.ToPILImage(),
transforms.Resize(299),
transforms.ToTensor()
])
self.num_datas = self.labels.shape[0]
def __getitem__(self, index):
image = self.images[index]
image = self.transforms[self.dtype](image)
return image, self.labels[index]
def __len__(self):
return self.num_datastrain_dataset = CatDogDataset(train_img, train_lb)
train_loader = DataLoader(train_dataset, batch_size = BATCH_SIZE)
train_iter = iter(train_loader)
images, labels = next(train_iter)
image = images[5]
print(f'dataset shape : {images.shape}')
plt.imshow(np.transpose(image, (1, 2, 0)))
valid_dataset  = CatDogDataset(valid_img, valid_lb)
valid_loader   = DataLoader(valid_dataset, batch_size = BATCH_SIZE)

valid_iter     = iter(valid_loader)
images, labels = next(valid_iter)
image          = images[3]

print(f'dataset shape : {images.shape}')
plt.imshow(np.transpose(image, (1, 2, 0)))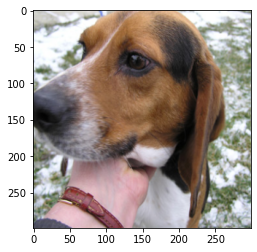
test_dataset  = CatDogDataset(test_img, test_lb)
test_loader   = DataLoader(test_dataset, batch_size = 1)

test_iter     = iter(test_loader)
images, labels = next(test_iter)
image          = images[0]

print(f'dataset shape : {images.shape}')
plt.imshow(np.transpose(image, (1, 2, 0)))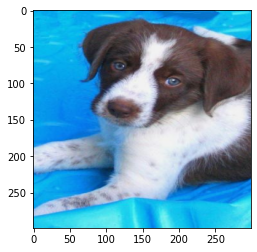
2. 신경망 구성하기
- 사전 학습된 모델을 이용해 전이 학습시키지 않고, 신경망을 직접 구성하였다.
class CatDogNet(nn.Module):

    def __init__(self):
        super(CatDogNet, self).__init__()

        self.conv1 = nn.Conv2d(3, 64, kernel_size = 3, stride = 1)
        self.bn1   = nn.BatchNorm2d(64)

        self.conv2 = nn.Conv2d(64, 32, kernel_size = 3, stride = 1)
        self.bn2   = nn.BatchNorm2d(32)

        self.conv3 = nn.Conv2d(32, 16, kernel_size = 3, stride = 1)
        self.bn3   = nn.BatchNorm2d(16)

        self.conv4 = nn.Conv2d(16, 8, kernel_size = 3, stride = 1)
        self.bn4   = nn.BatchNorm2d(8)

        self.drop  = nn.Dropout2d()
        self.fc1   = nn.Linear(128, 64)
        self.fc2   = nn.Linear(64, 32)
        self.fc3   = nn.Linear(32, 16)
        self.fc4   = nn.Linear(16, 2)

    def forward(self, x):

        ## FashionMNIST 때 사용했던 구성했던 간단한 구조의 CNN으로는
        ## 고양이와 강아지의 특징을 제대로 분류하지 못할 것 같아 조금 얕은듯 깊게 구성
        x = F.relu(F.max_pool2d(self.conv1(x), 2))
        x = self.bn1(x)

        x = F.relu(F.max_pool2d(self.conv2(x), 2))
        x = self.bn2(x)

        x = F.relu(F.max_pool2d(self.conv3(x), 2))
        x = self.bn3(x)

        x = self.bn4(self.conv4(x))
        x = F.avg_pool2d(x, 8)

        x = x.view(-1, 128)
        x = F.relu(self.fc1(x))
        x = self.drop(x)

        x = F.relu(self.fc2(x))
        x = self.drop(x)

        x = F.relu(self.fc3(x))
        x = self.drop(x)

        x = self.fc4(x)
        return F.log_softmax(x, dim = 1)
3. 학습 진행
def train(model, train_loader, optimizer):
    model.train()
    train_loss, correct = 0, 0

    for image, lb in train_loader:
        image, lb   = image.to(DEVICE), lb.to(DEVICE)
        optimizer.zero_grad()

        output = model(image)
        loss   = F.cross_entropy(output, lb)

        loss.backward()
        optimizer.step()

        pred = output.max(1, keepdim = True)[1]
        correct += pred.eq(lb.view_as(pred)).sum().item()
        train_loss += loss

    train_loss /= len(train_loader.dataset)
    train_acc   = 100 * correct / len(train_loader.dataset)

    return train_loss, train_acc


def evaluate(model, test_loader):
    model.eval()
    test_loss, correct = 0, 0

    with torch.no_grad():
        for img, lb in test_loader:
            img, lb   = img.to(DEVICE), lb.to(DEVICE)
            output = model(img)

            loss   = F.cross_entropy(output, lb)
            pred = output.max(1, keepdim = True)[1]

            correct += pred.eq(lb.view_as(pred)).sum().item()
            test_loss += loss

    test_loss /= len(test_loader.dataset)
    test_acc   = 100 * correct / len(test_loader.dataset)

    return test_loss, test_acc
model = CatDogNet().to(DEVICE)
optimizer = optim.SGD(model.parameters(), lr = LR, momentum = MOMENTUM)
scheduler = optim.lr_scheduler.StepLR(optimizer, step_size = STEP, gamma = 0.1)
## 기존 학습 과정과는 다르게 로그 그래프도 그려보기 위해 리스트를 생성함.
history = {
'train_loss' : [],
'train_acc' : [],
'valid_loss' : [],
'valid_acc' : []
}
## 학습을 돌려보자
for epoch in range(1, EPOCHS + 1):
scheduler.step()
train_loss, train_acc = train(model, train_loader, optimizer)
history['train_loss'].append(train_loss.item())
history['train_acc'].append(train_acc)
valid_loss, valid_acc = evaluate(model, valid_loader)
history['valid_loss'].append(valid_loss.item())
history['valid_acc'].append(valid_acc)
print(f'[{epoch} / {EPOCHS}] \nTrain Loss : {train_loss:.3f} | Train Acc : {train_acc:.3f} \nValid Loss : {valid_loss:.3f} | Valid Acc : {valid_acc:.3f} \n')
## 출력 결과
[1 / 100]
Train Loss : 0.011 | Train Acc : 56.767
Valid Loss : 0.010 | Valid Acc : 60.968
[2 / 100]
Train Loss : 0.010 | Train Acc : 65.454
Valid Loss : 0.009 | Valid Acc : 66.408
[3 / 100]
Train Loss : 0.009 | Train Acc : 69.907
Valid Loss : 0.009 | Valid Acc : 69.942
[4 / 100]
Train Loss : 0.009 | Train Acc : 73.138
Valid Loss : 0.008 | Valid Acc : 72.449
[5 / 100]
Train Loss : 0.008 | Train Acc : 75.324
Valid Loss : 0.008 | Valid Acc : 73.427
... 중략 ...
[95 / 100]
Train Loss : 0.003 | Train Acc : 93.355
Valid Loss : 0.003 | Valid Acc : 92.504
[96 / 100]
Train Loss : 0.003 | Train Acc : 93.192
Valid Loss : 0.003 | Valid Acc : 92.404
[97 / 100]
Train Loss : 0.003 | Train Acc : 93.242
Valid Loss : 0.003 | Valid Acc : 91.878
[98 / 100]
Train Loss : 0.003 | Train Acc : 93.599
Valid Loss : 0.003 | Valid Acc : 92.229
[99 / 100]
Train Loss : 0.003 | Train Acc : 93.374
Valid Loss : 0.003 | Valid Acc : 92.404
[100 / 100]
Train Loss : 0.003 | Train Acc : 93.255
Valid Loss : 0.003 | Valid Acc : 92.3793-1. 학습 결과 시각화
plt.plot(range(EPOCHS), history['train_loss'], 'y', label = 'train_loss')
plt.plot(range(EPOCHS),  history['valid_loss'], 'b',  label = 'valid_loss')
plt.title('Train, Valid Loss Graph')
plt.legend(loc='upper right')
plt.ylabel('loss value')
plt.xlabel('epoch')
plt.show()

## 출력 결과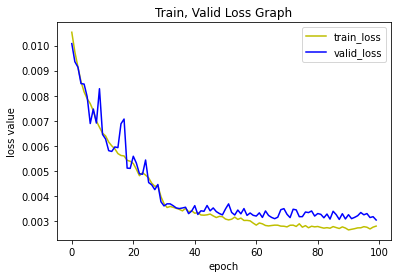
plt.plot(range(EPOCHS), history['train_acc'], 'y', label = 'train_acc')
plt.plot(range(EPOCHS), history['valid_acc'], 'b', label = 'valid_acc')
plt.title('Train, Valid Accuracy Graph')
plt.legend(loc='lower right')
plt.ylabel('Acc value')
plt.xlabel('epoch')
plt.show()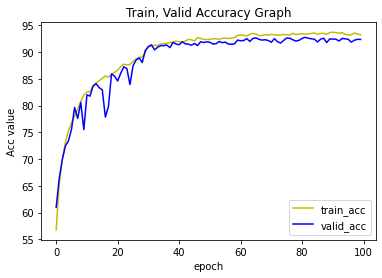
3-2. 모델 성능지표 계산
from sklearn.metrics import classification_report
label_to_digit = {'Cat' : 0, 'Dog' : 1}

## 성능 지표 계산함수
def validation(model, test_loader):
  model.eval()
  corrects = 0
  preds, gt = [], []

  for images, labels in test_loader:
    images, labels = images.to(DEVICE), labels.to(DEVICE)

    outputs = model(images)

    _, pred = torch.max(outputs, 1)
    corrects += torch.sum(pred == labels.data)

    preds.append(pred.item())
    gt.append(labels.data.item())

  acc = corrects / len(test_loader)
  print(f'Test Accuracy : {acc:.3f}\n')

  return classification_report(gt, preds, target_names = label_to_digit.keys())

report = validation(model, test_loader)
print(report)

## 출력 결과
Test Accuracy : 0.926

              precision    recall  f1-score   support

         Cat       0.93      0.92      0.93      2496
         Dog       0.92      0.93      0.93      2494

    accuracy                           0.93      4990
   macro avg       0.93      0.93      0.93      4990
weighted avg       0.93      0.93      0.93      4990
4. 마무리
- 이제 데이터 셋을 선정한 이유였던 짤방을 학습 시킨 모델에 입력시켜 보자

[자꾸보니 커엽다...]
test_image = cv2.imread('models/CAT.jpg')
test_image = cv2.cvtColor(test_image, cv2.COLOR_BGR2RGB)
test_image = cv2.resize(test_image, (312, 312))

external_dataset  = CatDogDataset(np.array([test_image]), np.array(['cat']))
external_loader   = DataLoader(external_dataset, batch_size = 1)

external_iter     = iter(external_loader)
images, labels = next(external_iter)
image          = images[0]

print(f'dataset shape : {images.shape}')
plt.imshow(np.transpose(image, (1, 2, 0)))

## 출력 결과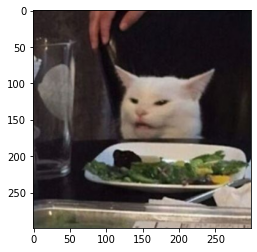
digit_to_label = {0 : 'Cat', 1: 'Dog'}

model.eval()
for images, _ in external_loader:
    images = images.to(DEVICE)

    outputs = model(images)
    _, pred = torch.max(outputs, 1)

plt.imshow(np.transpose(image, (1, 2, 0)))
plt.title(f'predicted label : {digit_to_label[pred.item()]}')
plt.axis(False)

## 출력 결과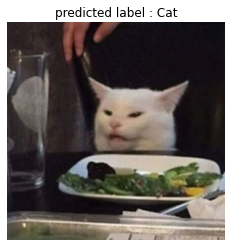
- 테스트 해 본 결과 학습시킨 모델이 제대로 고양이로 판정하였다.
- AI가 세계를 지배할 수도 있을지도...?
99. 참고자료
99-1. 도서
99-2. 논문, 학술지
99-3. 웹 사이트
- 공부합시다 - Data Analysis / 구글 코랩과 캐글 연동하기 | [블로그 링크]
99-4. 데이터셋 출처
- Kaggle - Cats-vs-Dogs | [데이터 셋 링크]
전체코드
GitHub - EvoDmiK/TIL: Today I Learn
Today I Learn. Contribute to EvoDmiK/TIL development by creating an account on GitHub.
github.com
내용 추가 이력
부탁 말씀
개인적으로 공부하는 과정에서 오류가 있을 수 있으니, 오류가 있는 부분은 댓글로 정정 부탁드립니다.
728x90
Comments